Search This Blog

Thursday, May 4, 2017

Done!!!

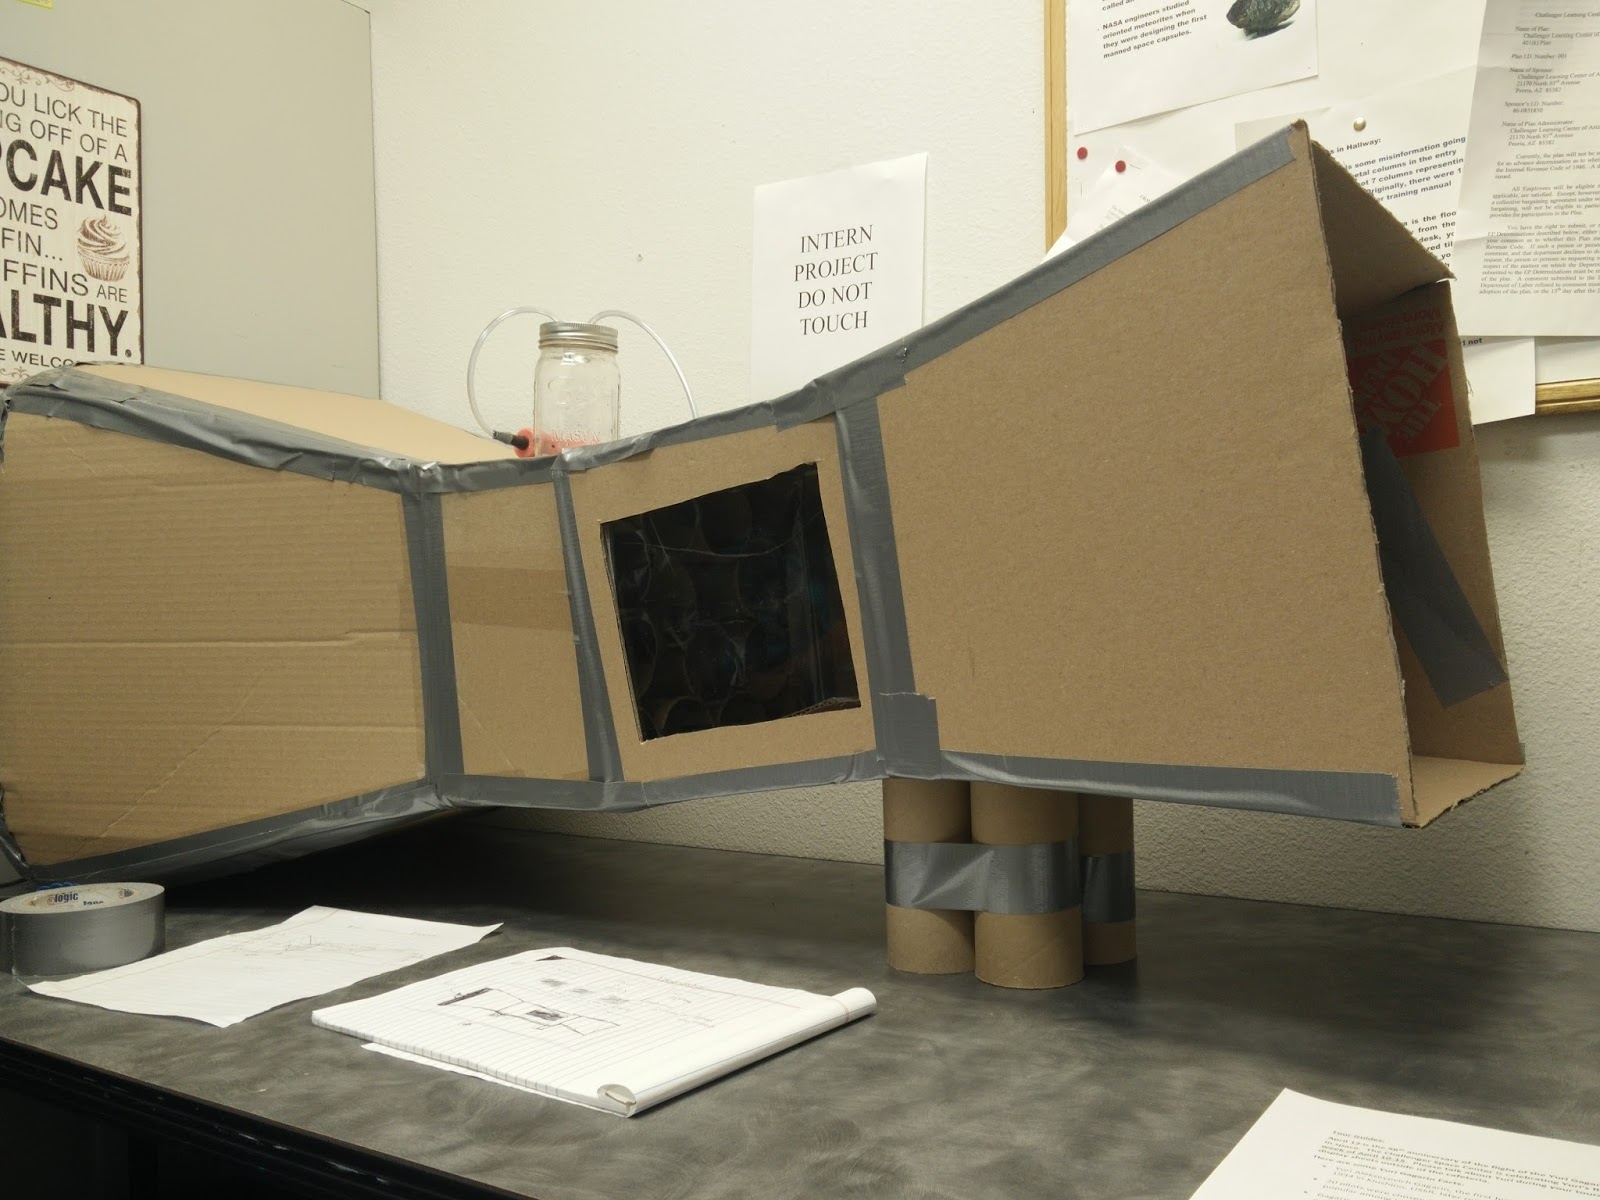
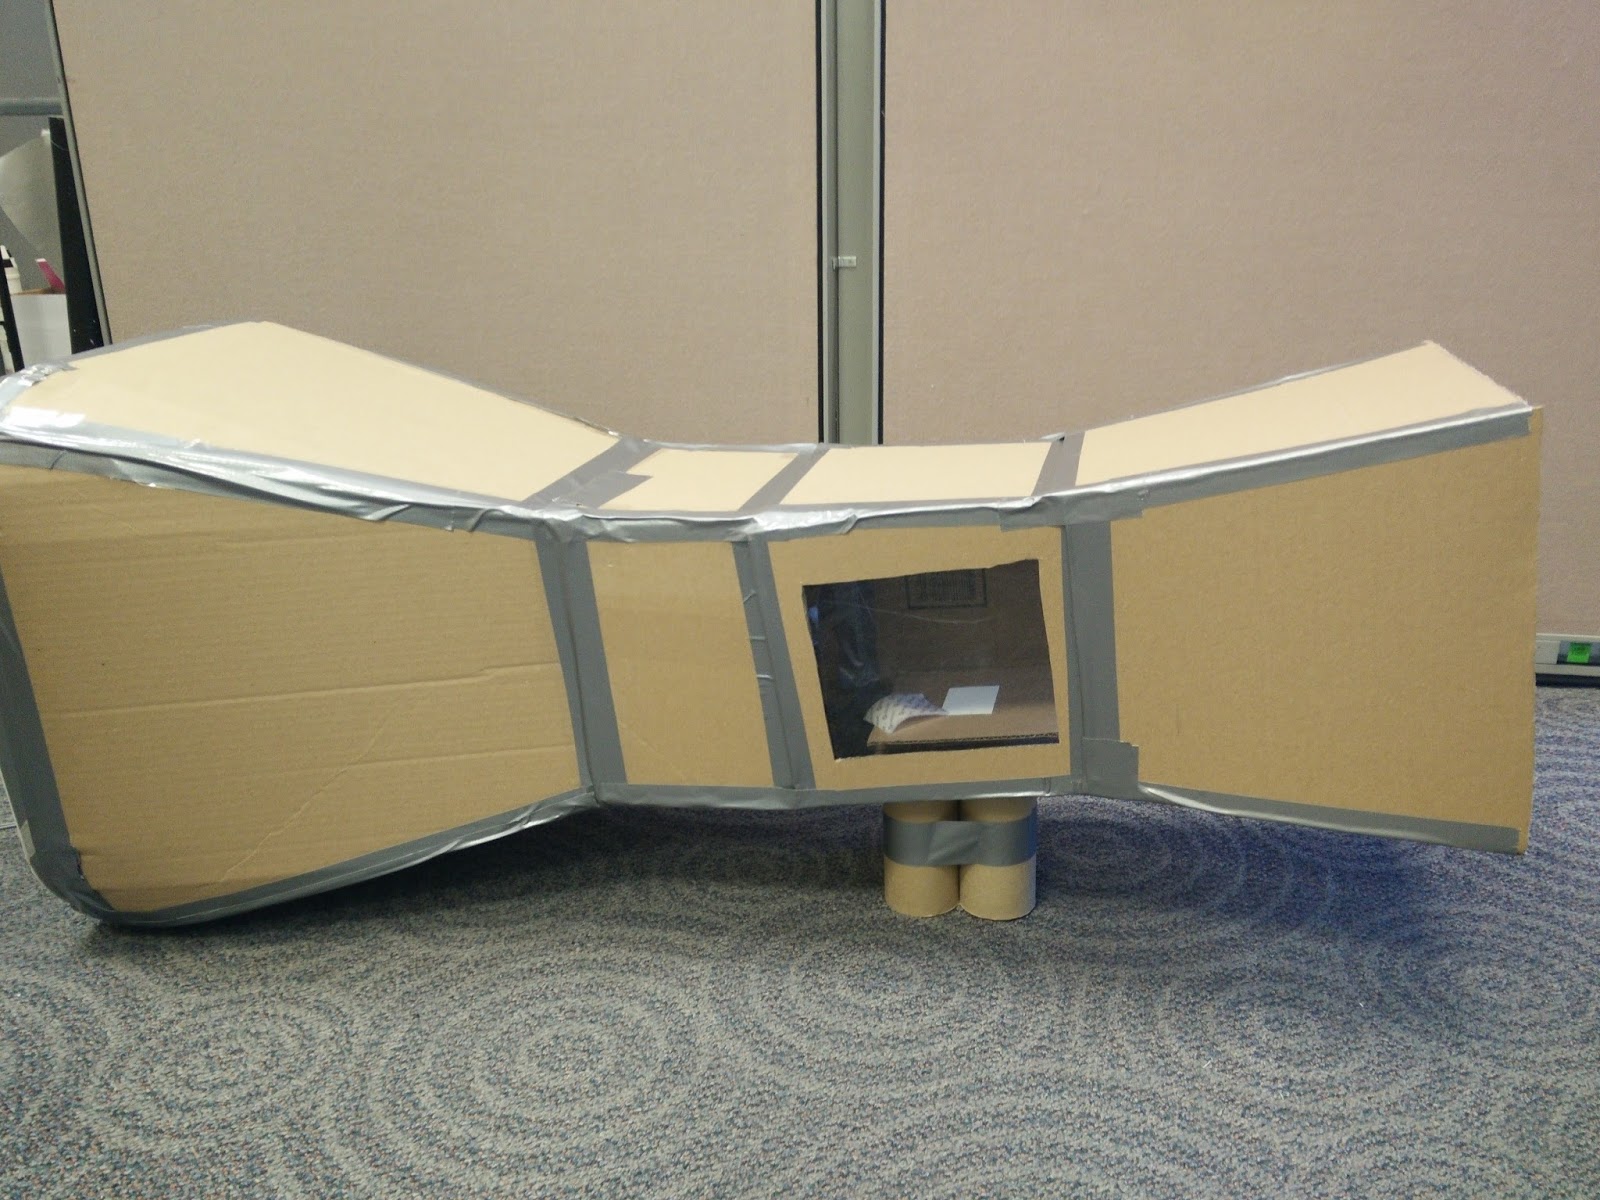
I have finished my wind tunnel with adding some objects for testing later. I still have not figured out how to test the objects as the CO2 from the dry ice plus water is not working well. I might just leave the wind tunnel at the center until I find a solution to this problem. I did set up the display by adding some information on wind tunnels and how they work on the wall behind the wind tunnel for visitors. I think that everyone who visits the Space Center will definitely leave it after learning something about wind tunnels. I am still working on testing the objects, but besides that I am basically done. I just want to say thanks to everyone who kept up with my project and I can't wait to present it this May 6 at BASIS Phoenix. I still work on my poster, but besides that my presentation is basically done.


Thank You!!

My final presentation:  https://docs.google.com/presentation/d/1R4JHEp4vvfzfZ83jkDhkgIyggk_Y4ii6ZAQgqkG0Hx0/edit#slide=id.g20976b1344_1_23

Thursday, April 27, 2017

Final Problems

I had some issues with my flow visualization which is how I wanted to test the objects in the wind tunnel. I intended to use dry ice with warm water to give off the smokey effect of CO2, but it did not work as well as I thought it would. I could not record a video of it because it was basically invisible unless you were there in person. I might try other methods of smoke like smoke bombs or something, but this is my situation right now. I really put my money on the dry ice  after reading many reviews on how good the smokey effect is. I might try it again with more in a darker place with better lighting so that I can get a good video of us testing a toy helicopter in the wind tunnel. 

Monday, April 24, 2017

Flow Straightener

A flow straightener, sometimes called a honeycomb, is a device used to straighten the air flow in a wind tunnel. It is a passage of ducts, laid along the axis of main air stream to minimize the lateral velocity components caused by swirling motion in the air flow during entry. The cross-section shapes of these "honeycombs" may be of square, circular and regular hexagonal cells.

Wednesday, April 19, 2017

Open Circuit Wind Tunnels

The advantages of open circuit wind tunnels is first the low construction cost. These are easy to make and are cheap. It's a better design for propulsion and smoke visualization. There is no accumulation of exhaust products in an open tunnel.

The disadvantages are poor flow quality in the wind tunnel. The tunnels should also be kept away from other objects in the room that produce asymmetries to the bellmouth. It can also be affected by wind and weather.The fan must must continually accelerate flow through the tunnel. It is also noisy which can be inconvenient.   

Monday, April 17, 2017

Closed Circuit Wind Tunnels

The advantages of closed circuit wind tunnels are that the fan blades are less vulnerable to damage. The noise is lower and the particle being tested can be easily contained. Outside air movements like air vents don't affect the wind tunnel. The power requirement for a given speed is lower. The air entering the test section is also free of debris.

The disadvantages are that the cost for these types of wind tunnels are significantly higher compared to the open circuit wind tunnels. The recycled air supply can be disastrous when working with combustion engines. It requires more space as these tend to be a bit bigger. The increeasing air pressure can be an issue during prolonged use.

Wednesday, April 12, 2017

Schlieren photograph

Schlieren photography is similar to the shadowgraph technique and relies on the the fact that light rays are bent whenever they encounter changes in density of a fluid. Schlieren systems are used to visualize the flow away from the surface of an object. The schlieren system shown in this figure uses two concave mirrors on either side of the test section of the wind tunnel. A mercury vapor lamp or a spark gap system is used as a bright source of light. The light is passed through a slit which is placed such that the reflected light from the mirror forms parallel rays that pass through the test section. On the other side of the tunnel, the parallel rays are collected by another mirror and focused to a point at the knife edge. The rays continue on to a recording device like a video camera.

Now if the parallel rays of light encounter a density gradient in the test section, the light is bent, or refracted. In our schematic, a shock wave has been generated by a model placed in the supersonic flow through the tunnel test section. Shock waves are thin regions of high gradients in pressure, temperature and density. A ray of light passing through the shock wave is bent as shown by the dashed line in the figure. This ray of light does not pass through the focal point, but is stopped by the knife edge. The resulting image recorded by the camera has darkened lines that occur where the density gradients are present. The model completely blocks the passing of the light rays, so we see a black image of the model. But more important, the shock waves generated by the model are now seen as darkened lines on the image. We have a way to visualize shock waves.

Monday, April 10, 2017

Smoke Section

This blog post is regarding to problems that I encountered while doing the smoke section. I cut out two holes in the jar for the pipes. One hole was for the pump for me to manually pump the dry ice CO2 into the wind tunnel. The other hole was for the pipe to enter the wind tunnel.

The second hole was a little to big making it harder for me to close it with hot glue as hot glue is a water tight sealant. I had to redo the whole thing which took an extra day, but that's engineering for you. I also had to change the positions of the pipes to make it easier for the CO2 to hit the object being tested in a uniform way. 

Friday, April 7, 2017

Final Product

04/07/17

I have finally finished my wind tunnel. The last few weeks here at my internship, I will be making some test models for the wind tunnel and I will also be working on my display for the center that incorporates the wind tunnel. My on-site adviser will get dry ice one day where we will take a video of us testing the wind tunnel with the models I created.

Tuesday, April 4, 2017

The World's Largest Wind Tunnel

04/04/17

The largest wind tunnel in the world is big enough to test a 737 airplane, and is part of NASA Ames Research Center’s state-of-the-art aerodynamics complex.

The wind tunnel, which is 80 feet by 120 feet, is actually one of two giant wind tunnels at NASA Ames National Full-Scale Aerodynamics Complex at Moffett Field. As it’s able to accommodate planes with wing spans of up to 100 feet, nearly all commercial aircraft made in the United States since 1987 have been tested in the subsonic tunnel. The tunnel can replicate the wind conditions of flight via six 22,500-horsepower motors with blades as tall as four-story buildings. It’s also used to test flight technology for space, such as parachutes for Mars missions.

Thursday, March 23, 2017

Wind Tunnel Tests

03/23/17


In some wind tunnel tests, flow visualization techniques are used to provide diagnostic information. Visualization techniques include free stream smoke, laser sheet, or surface oil flow. The assumption is made that the flow visualization medium moves exactly with the flow. Shadow-graphs or schlierin systems are used to visualize the shape and location of shock waves in compressible flows. For low speed flows, tufts or surface oil indicate the flow direction along the surface of a model.(This is the method that I will use to test my models as it is the most practical one.)

In some wind tunnel tests, the model is instrumented to provide diagnostic information about the flow of air around the model. Diagnostic instrumentation includes static pressure taps, total pressure rakes, laser Doppler velocimetry, and hot-wire velocity probes. A diagnostic test does not provide overall aircraft performance, but helps the engineer to better understand how the fluid moves around and through the model. There are a variety of flow control devices that are employed to improve performance of the aircraft, if the local flow conditions are known. Depending on the type of instrumentation used in the experiment, steady state flow or unsteady, time-varying, flow information can be obtained. The engineer must use some experience when employing flow diagnostic instrumentation to properly place the instruments in regions of flow gradients or separations.

In some wind tunnel tests, the model is instrumented with pressure taps and the component performance is calculated from the pressure data. Total pressure measurement is the normal procedure for determining aircraft inlet performance. Theoretically, the aerodynamic force on an aircraft model could be obtained using pressure instrumentation by integrating the pressure times an incremental area around the entire surface of the model. But, in practice, pressure integration is not used because of the large number of taps necessary to accurately resolve pressure variations. Airfoil drag can be determined by integrating the total pressure deficit in the wake created by a wing model.

In some wind tunnel tests, the aerodynamic forces and moments on the model are measured directly. The model is mounted in the tunnel on a special machine called a force balance. The output from the balance is a signal that is related to the forces and moments on the model. Balances can be used to measure both the lift and drag forces. The balance must be calibrated against a known value of the force before, and sometimes during, the test.

Wednesday, March 22, 2017

Gas Section

03/22/17

I still have not gotten the materials yet for this section, but at the end of the post I listed what I need so you guys get a glimpse of the materials that I will be using in order to make this section.This step is essential to the tunnel since you need some kind of indicator to be able to see the approximate wind flow. The single most important tip I would give is to use dry ice and warm water if you have access to it.  The purpose of the water is to speed up the process of creating smoke since the cooler the temperature of the system, the less likely the ice wants to sublimate into CO2 gas.  It is also cleaner and doesn't clog up the tubing as much.  Only downside is that you need a water catcher under the tubing when the cold air condenses inside the tubing creating water.

~Materials
-Jar w/ lid
-Hand pump of some kind
-1+ ft of Airline tubing (fish tank)
-Hot Glue/ Water tight sealant
-Incense / Dry Ice + warm water

~Tools
-Drill w/ right bit for the tubing and pump head to fit into

Thursday, March 9, 2017

Almost Finished


03/09/17

This post is going to be talking about the progress I have made onto my wind tunnel so far this week.

I am almost done with the wind tunnel as I have to just install the gas section and spray paint the whole wind tunnel in the colors of the space center. I talked to my on-site mentor, Jon Van de Water, and we are still  uncertain on whether we are going to use this one as a display or make another wind tunnel based off of this one. This wind tunnel turned out pretty good and we can still use it to test objects, so we are in a dilemma right now. If we decide to use this one then my work on making wind tunnels will be done and I can start to focus on making the display for the center which incorporates the wind tunnel. Otherwise, I have to help make another wind tunnel then focus on making a display which is just a lot of work as it took me about five weeks to just finish one out of cardboard. Another one with better material might take longer and I don't have that much time so we might just use this one in the display. I will get a lot of help on the other wind tunnel though as I would be working on it with people who work at the center. They used to be engineers so maybe it would be finished pretty quickly, but who knows exactly how long it would take. This is pretty much it for now and look down below for pics and videos showing how the wind tunnel looks right now.


Thursday, March 2, 2017

How does it work?

03/02/17

Wind tunnels are used by engineers to test the aerodynamics of many objects, from jet wings to car windshields. Aerodynamics as a science studies the flow of air or gases around an object in motion. With a better understanding of the way air moves around (or through) objects, manufacturers can devise and create faster, safer, more reliable and more efficient products of all kinds.

Wind tunnels are simply hollow tubes; at one end, they have powerful fans that create a flow of air inside the tunnel. Some tunnels are desktop-sized and good for testing only very small objects. Other tunnels are massive structures in which engineers test full-size aircraft and cars. Although the test materials (usually) remain stationary, rapid airflow inside the tunnel makes it seem as though objects are moving.

Typically, there are sensors and instruments inside wind tunnels that give scientists hard data regarding an object's interaction with wind. And often, there are windows that let those same scientists observe experiments visually. With those data and observations, engineers grapple with variables of aerodynamics such as pressure, velocity, temperature and density. They gauge lift, drag, shockwaves and other conditions that affect planes and other contraptions that speed through the wind. In addition, these tunnels can help engineers figure out how wind interacts with stationary objects, such as buildings and bridges, and find ways to make them stronger and safer.

Measuring airflow is tricky as air is invisible, so how do you see whether a plane is performing well or badly inside the tunnel? There are three main ways. You can use a smoke gun to color the airstream white, then watch how the smoke shifts and swirls as it passes the plane. You can take what's called a Schlieren photograph, which makes variations in the air speed and pressure show up so you can see them. Or you can use anemometers (air-speed measuring instruments) to measure how fast the wind is going at different points around the plane. Armed with your measurements and lots of complex aerodynamic formulas, you can figure out how good or bad your plane is and whether it would really stay up in the sky.

Wednesday, March 1, 2017

Progress

03/01/17


This week so far has been really exciting as I am seeing it all come together. I am almost finished with the wind tunnel and it doesn't look that bad for my first time. I just need to finish the last section, the diffuser, then I am done. I already cut out the parts of cardboard for that section its just that I have to tape them all together. After that I need to install a gas section on top of the wind tunnel so that we can see the wind's effects on whatever we are testing.

Besides building the wind tunnel, I also take part in many activities at the center. I am learning more about the aerospace industry everyday as I am talking to people who work at Raytheon or Boeing which are some big aerospace companies. I have learned a lot about aerospace engineering by talking to many engineers who work at those companies as they tell me what they do on a day to day basis and how the job actually is. They tell me a lot about being an aerospace engineer like the problems they face and how they handle it. I am just happy that I am gaining a lot of experience here on my field of interest which is going to benefit me in the future. Everyone at the center has been really helpful as they check on me everyday and see my progress.
They are all so experienced at what they do so each conversation I have with them is like its own seminar on the aerospace industry. Its also cool to see that the center has many connections with NASA which is where I want to work eventually. I might even get to talk to some people at NASA in the near future which excites me the most as I have so many questions for the aerospace engineers who work there. These connections that I am making with various aerospace industry specialists has really been informative and helpful.

Schools from all over the Phoenix area take field trips here daily and sometimes I get to help the staff coordinate the field trips. The kids participate in these space missions and hypothetical scenarios in space. They also get to take part in various space simulations like the "Voyage to Mars" where the time frame of this mission is sometime in the not-too-distant future, when humans have established a permanent base on Mars. Crew members will serve as the first crew on Mars and the relief crew en route to the planet. While on the Martian surface, the team will have collected and analyzed a great number of planetary samples and data. This information is vital to scientists for a better understanding of the planet Mars. Crew members also will have gained an appreciation for the "luxuries" of planet Earth such as air, water and food as compared to a barren planet such as Mars.

These types of missions are for everyone and I have a lot of fun helping the kids out with these missions and other activities. Everyday I do something different like build my wind tunnel, help with the field trips, talk to people from the aerospace industry, or even help with the normal tours around the center. Overall, I am just really happy that I found the perfect internship for me that correlates with what I want to do in the future and I know for a fact that all these experiences and connections that I am making are going to definitely benefit me in the future. 

Friday, February 24, 2017

Solving Problems

02/24/17

This post is going to be addressing my post on February 16 regarding the problems that I encountered while building the wind tunnel.

I realized the cardboard rolls where not the issue, but it was the placement of them which really messed it up. I tried to place them slanted inside the cone part when I could of just placed them in my flow straightener part which is more or less a square. It being a square made it easy for me to line them up making the wind tunnel more stabilized as well.

I hope the visual makes it easier for you guys to understand where those cardboard rolls are located now. I previously had them in the cone part making it slanted which caused the issues. They are now in this part of the wind tunnel making it easier for me to duct tape them together. I also got stronger duct tape which helped a lot. I just have to close this part up and start working on the viewing and diffuser sections of the wind tunnel. Once this is complete, my on-site adviser and I will start to work on the real model wind tunnel which will look a lot better than this one. We will use this wind tunnel as a layout as we are also going to be testing how well this layout works by putting a fan in it. The fan should be able to point out any structural mistakes, but its mostly to see if you can view what we are testing and how it is being affected by the wind as that is the main point of a wind tunnel. If this does not work, then lets just say we would have to start all over again with a fresh and better design. If we have to start over again then we would just start to build the real wind tunnel and ignore building another prototype. I mean we would have to be more careful as we can't mess up this time as its the real deal now. 

Tuesday, February 21, 2017

Types of Wind Tunnels

02/21/17

Wind tunnels can be classified based on airflow speed in test section and based on shape.

Based on Flow Speed:

1. Subsonic or low speed wind tunnels:

Maximum flow speed in this type of wind tunnels can be 135m/s. Flow speed in wind tunnels is generally preferred in terms of Mach number which comes out to be around 0.4 for this case. This type of wind tunnels are most cost effective due to the simplicity of the design and low wind speed. Generally low speed wind tunnels are found in schools and universities because of low budget.

2. Transonic wind tunnels:

Maximum velocity in test section of transonic wind tunnels can reach up to speed of sound ie 340m/s or Mach number of 1. These wind tunnels are very common in aircraft industry as most aircrafts operate around this speed.

3. Supersonic wind tunnels:

Velocity of air in test section of such wind tunnels can be up to Mach 5. This is accomplished using convergent - divergent nozzles. Power requirements for such wind tunnels are very high.

4. Hypersonic wind tunnels:

Wind velocity in test section of such type of wind tunnels can measure between Mach 5 and Mach 15. This is also achieved using convergent - divergent nozzles.

Based on Shape:

1. Open circuit wind tunnel:

This type of wind tunnel is open at both ends. The chances of dirt particles entering with air are more so more honeycombs (mesh to clean incoming air) are required to clean the air. Open type wind tunnels can further be divided into two categories:

a) Suckdown tunnel: With the inlet open to atmosphere, axial fan or centrifugal blower is installed after test section. This type of wind tunnels are not preferred because incoming air enters with significant swirl.

b) Blower tunnel: A blower is installed at the inlet of wind tunnel which throws the air into wind tunnel. swirl is a problem in this case as well but blower tunnels are much less sensitive to it.

2. Closed circuit wind tunnel:

Outlet of such wind tunnel is connected to inlet so the same air circulates in the system in a regulated way. The chances of dirt entering the system are also very low. closed wind tunnels have more uniform flow than open type. This is usually a choice for large wind tunnels as these are more costly than open type wind tunnels.

Thursday, February 16, 2017

Problems

02/16/17


The initial problems are finally here! The cardboard rolls that I am using to make the air more centralized in my wind tunnel keeps falling off. I need to either go smaller so that it can structurally be more stable as they are too big or try to find better duct tape. This is so frustrating as even with these cardboard rolls inside the wind tunnel, the air still seems like its not as centralized as I want it to be. I am also thinking about using straws to see if that makes it better. Straws would also make it easier for me to duct tape them to the wind tunnel as I wouldn't have to worry about the symmetry of them in the wind tunnel. The cardboard rolls were pretty big so I had to actually plan out were to keep each one so that it would be symmetric, but with straws I can just put a bunch together because they are so small. I was also thinking about using toilet paper rolls as they are not too big or too small,but I feel like I should use it for the outer layers and for the inner layer use straws so the air would get pretty centralized as it goes through the straighter part of the wind tunnel. I knew these engineering problems were gonna arise, but now that they are here this whole process is starting to be more stressful than fun.

Tuesday, February 14, 2017

Introduction

02/14/17


Hello everyone, and welcome to my blog!


My name is Sayish Karthikeyan, and I am a senior at BASIS Phoenix High School. This blog is dedicated to cover the experiences of my internship at the Challenger Space Center. I am extremely happy to cover what I am doing at the Space Center and hope you guys will join me on my journey.


My project's purpose  is to build a wind tunnel that can help teach students who come to the Space Center about aircraft stability and wing structures of planes. It will help students understand the integrity of a plane and its structure. This model wind tunnel that I will construct will be used as a layout for a more permanent display at the Space Center. After I create the model design, we will start to work on the real display and wind tunnel to keep at the Space Center. This permanent display at the Space Center will really help the kids who come visit understand what a wind tunnel is and how it is used. They will understand the importance of a wind tunnel and how it is used to test the stability of any aerodynamic structure. There are many different ways to construct a wind tunnel so the research I will be doing is to understand the different types and the advantages and disadvantages of each one. The engineering side of the wind tunnel will be my main focus, as a way to understand the nuances that goes behind creating this structure.


What is a Wind Tunnel? A wind tunnel is a tool used in aerodynamic research to study the effects of air moving past solid objects. A wind tunnel consists of a tubular passage with the object under test mounted in the middle. Air is made to move past the object by a powerful fan system or other means.

Challenger Space Center


You can view my proposal here.

You can view my syllabus here which outlines what I will be doing on a week to week basis at my internship.

Wednesday, February 8, 2017

The cone

02/08/17


It is my third day at the internship and I finished the cone structure for my prototype. There are few errors with it as the fan is not a perfect box leaving the corners exposed. I am thinking about adding some material in the corners to make it enclosed allowing the wind from the fan to be more centralized.
The cone

Tuesday, February 7, 2017

Design of the Wind Tunnel

02/07/17


It is my second day at the internship and my first blog post. I have started to work on the design of the prototype wind tunnel which is what we will use as a layout to make the real one for display at the Challenger Space Center.
This picture shows the design of the prototype wind tunnel.